Please note, we can perform this service work for you, see this link JEFA Tech WiFi Repeater Repair and Service
The following instructions describe how to reset and reload the configuration for your AIRGATEWAY indoor access point. You should follow this procedure if you are having the following symptoms when using your JEFA Tech Repeater XR PLUS:
- My repeater’s private WiFi network doesn’t show up anymore, but I do see a WiFi network called www.ubnt.com
This procedure must be performed with a computer (Windows or MAC). It is not possible to do this procedure with a smartphone or tablet.
- Download and save the AIRGATEWAY configuration file – click this link to download
- Remove the wall mount bracket from the AirGateway
- While the unit is powered on, using a paper clip, press and hold the AirGateway reset button on the back of the POE Injector for 15 seconds and release

- Connect to the WiFi network named www.ubnt.com
- Set your WiFi Network Interface to a static IP address of 192.168.1.21 – click here for more detailed information -> WINDOWS – MAC OS X
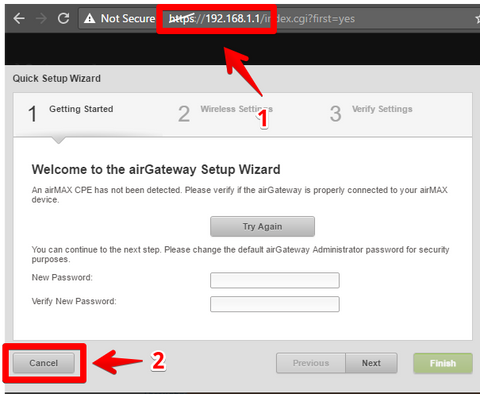
- Open your web browser and go to http://192.168.1.1 You may get a warning that the page is not secure. It is okay to proceed. If you get “page cannot be displayed”, double check you have set your static address correctly in step 3.
- Enter username: ubnt password: ubnt Select your country, check the box to agree to terms, and click “Login”
- You will see “Welcome to the airGateway setup Wizard” Click “Cancel”

- Wait 30 seconds. The airGateway is now rebooting
- Verify you are still connected to the WiFi network named www.ubnt.com You may have been disconnected when the airGateway rebooted
- Click on the System Tab
- You will see an orange box stating that using a default Administrator password. Click Dismiss
- Near the bottom right, look for “Upload Configuration”
- Click the “Choose File” button and select the “AIRGATEWAY.cfg” that you downloaded in step 1
- Click the “Upload” button
- At the top right, click “Apply”

- The update is now complete. Close your web browser.
- Set your WiFi Network Interface back to a dynamic DHCP IP address – click here for more detailed information -> WINDOWS – MAC OS X
- You should now be able to use your Repeater XR as normal. Try going to the configuration page at http://192.168.123.1


